


A simple example of integrating gnark with immudb
A simple example of integrating gnark with immudb
Thank you to Farhan for your thoughtful and insightful article.
In recent years, zero-knowledge proof (ZKP) systems have become increasingly popular due to their ability to provide privacy and security in various applications. Gnark is one such system that has been gaining traction in the ZKP space. It allows developers to build circuits and generate proofs that can be used to verify certain computations without revealing any sensitive information. If you are new to ZK Proofs, read my article on the introduction to this topic.
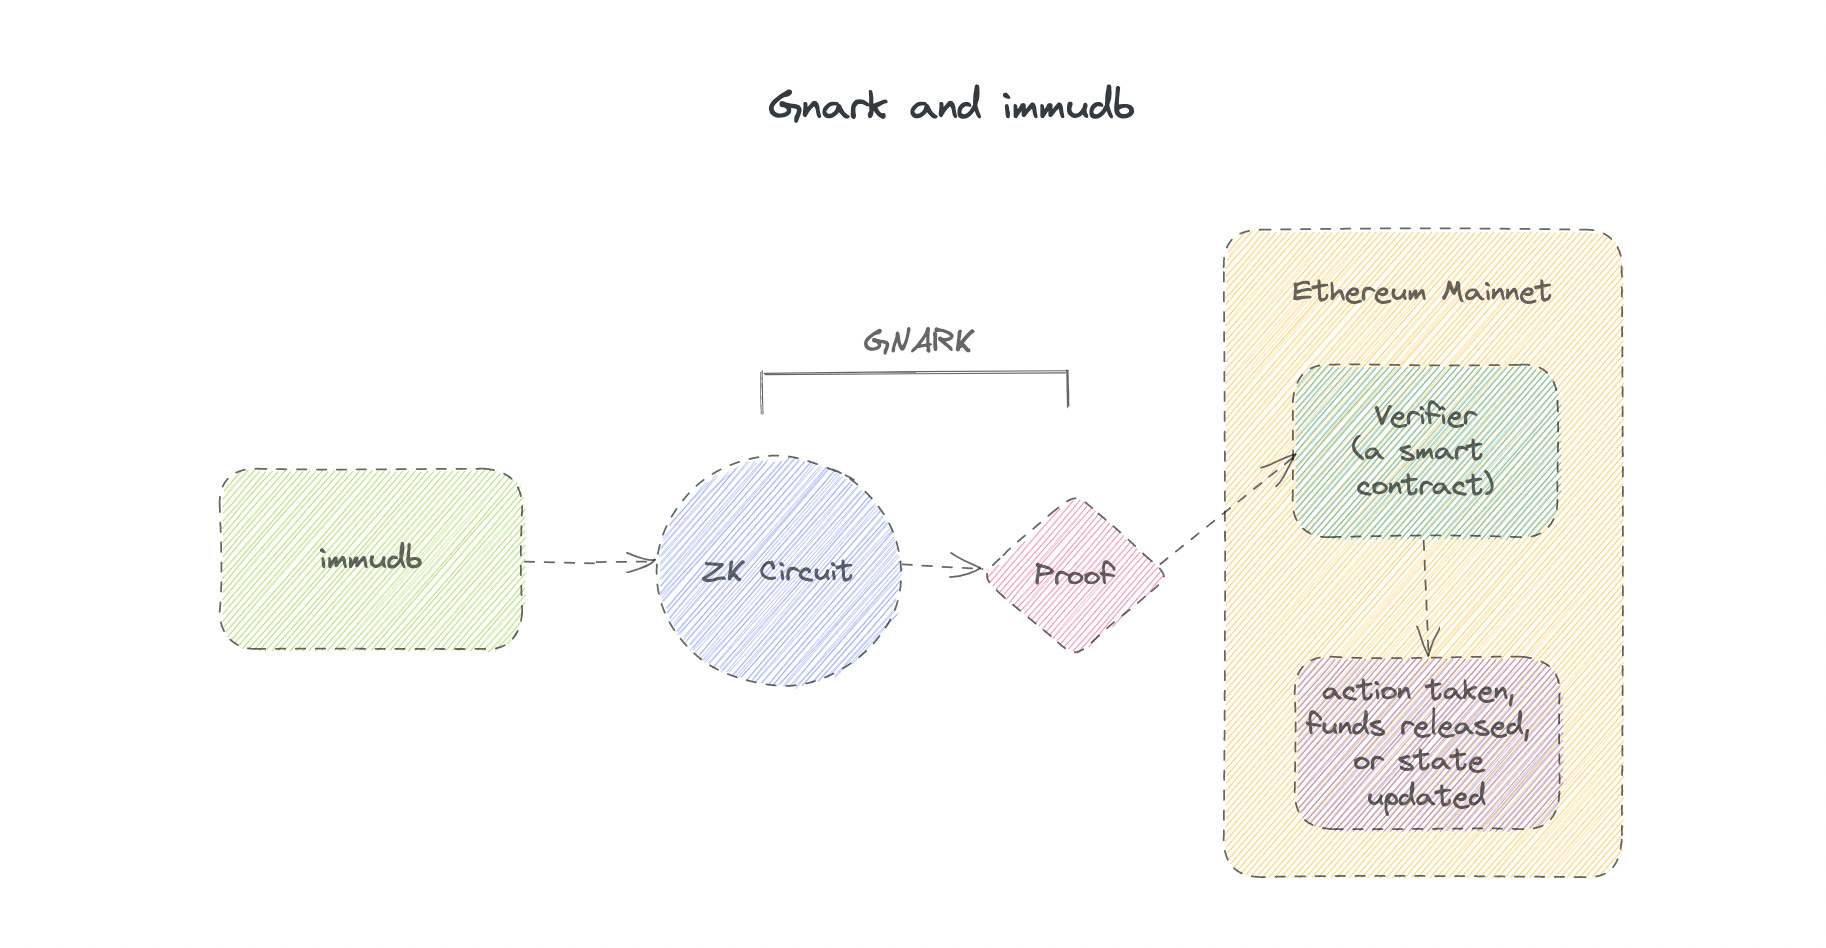
However, building a secure and scalable infrastructure to store and manage these proofs can be a challenge. This is where immudb, a lightweight and immutable database, comes in. In this article, we will explore how to integrate Gnark with immudb to securely store and verify circuit proofs.
What is immudb?
immudb is a general purpose immutable database that provides a tamper-proof and auditable ledger with the help of cryptographic proofs. It uses a Merkle tree structure to ensure that every change made to the database is cryptographically verifiable. This makes immudb ideal for storing sensitive information that needs to be audited and secured. You can learn more about immudb here.
Every record that is added to immudb is given a unique hash, which is used to construct a Merkle tree. This hash provides a cryptographic proof that the record has not been tampered with.
What is Gnark?
Gnark is a zero-knowledge proof (ZKP) system that allows developers to build circuits and generate proofs that can be used to verify certain computations without revealing any sensitive information. It uses a circuit-based approach to build proofs, which means that developers can build circuits that represent a specific computation and generate a proof that can be used to verify the result of that computation. If you are interested in learning more about GNARK, refer to my article here.
Let’s take a simple example to illustrate how to build a circuit using Gnark. Suppose we want to create a circuit that verifies whether a given number x is equal to 42. We can express this as a Boolean constraint using the following equation:
(x - 42) == 0To build this circuit using Gnark, we can write the following Go code:
package main

import (
	"fmt"

	"github.com/consensys/gnark/frontend"
	"github.com/consensys/gnark/backend"
)

func main() {
	// define the circuit
	circuit := frontend.New()

	// define the inputs
	var x frontend.Variable
	circuit.Assign(&x, 10)

	// define the constraints
	circuit.AssertIsEqual(x.Sub(frontend.UntypedConstant(42)), frontend.UntypedConstant(0))

	// compile the circuit
	r1cs, err := circuit.ToR1CS()
	if err != nil {
		panic(err)
	}

	// generate the proving and verification keys
	pk, vk := backend.Groth16Setup(r1cs)

	// create the proof
	proof, err := backend.Groth16Prove(r1cs, pk, backend.Assignments{
		"x": x.Value,
	})
	if err != nil {
		panic(err)
	}

	// verify the proof
	valid := backend.Groth16Verify(proof, vk, backend.Assignments{
		"x": x.Value,
	})
	if !valid {
		panic("invalid proof")
	}

	fmt.Println("proof is valid")
}
In this example, we define a circuit using the frontend package provided by Gnark. We then define an input variable x and set its value to 10. We define the constraints using the AssertIsEqual method, which checks whether the expression (x - 42) == 0 is true.
We then compile the circuit into a rank-1 constraint system (R1CS) using the ToR1CS method. We generate the proving and verification keys using the Groth16Setup method. We create a proof using the Groth16Prove method and verify it using the `Groth16Verify
Why use ZK Proofs with immudb?
Firstly, immudb’s immutable nature makes it ideal for storing the state of the circuit. The circuit’s state is an essential part of zero-knowledge proof systems, and immutability guarantees that the state cannot be changed after it has been committed to the database. This is a critical requirement for any system that needs to provide tamper-evident data storage.
Secondly, immudb provides efficient storage and retrieval of key-value pairs, which is the data structure used by gnark to store the circuit’s public inputs and proofs. The integration of gnark and immudb allows for efficient and secure storage and retrieval of these key-value pairs.
Thirdly, immudb’s support for cryptographic authentication and authorization mechanisms ensures that only authorized parties can access the circuit’s data. This provides an additional layer of security and trust in the zero-knowledge proof system.
Lastly, immudb’s easy-to-use API and seamless integration with gnark make it a great choice for implementing zero-knowledge proof systems. With immudb, developers can focus on building and verifying the circuit while immudb takes care of secure and tamper-evident storage.
Hence integration of gnark with immudb provides an efficient and secure solution for building and verifying zero-knowledge proof circuits. Immudb’s immutable storage, efficient key-value store, cryptographic authentication and authorization mechanisms, and easy-to-use API make it an excellent choice for developers looking to build robust zero-knowledge proof systems.
Integrating Gnark with immudb
Now that we have a basic understanding of immudb and Gnark, let’s dive into how we can integrate these two systems to store and verify circuit proofs.
Step 1: Set up immudb
The first step is to set up immudb. You can download the immudb binary from the official website here and install it on your system. Once installed, you can start immudb by running the following command:
wget https://github.com/codenotary/immudb/releases/download/v1.4.1/immudb-v1.4.1-linux-amd64
mv immudb-v1.4.1-linux-amd64 immudb
chmod +x immudb

# run immudb in the foreground to see all output
./immudb

# or run immudb in the background
./immudb -d
This will start the immudb server on the default port 3322. You can also specify a custom port by passing the --port flag.
Step 2: Set up Gnark
Next, we need to set up Gnark. You can install Gnark by running the following command:
go get -u github.com/consensys/gnark/...This will install Gnark and its dependencies on your system.
Step 3: Build a Circuit and Generate a Proof
Once Gnark is installed, we can start building circuits and generating proofs. In this example, we will build a simple circuit that adds two numbers and generate a proof that can be used to verify the result of the computation.
- Import the necessary packages in your Go program:
import ( "fmt" "log" "github.com/codenotary/immudb/pkg/api/schema" "github.com/codenotary/immudb/pkg/client" "github.com/consensys/gnark/backend/groth16" "github.com/consensys/gnark/frontend" ) - Define the circuit you want to store in immudb. For example, let’s say you want to create a circuit that verifies the multiplication of two numbers:
type circuit struct { // define circuit variables A frontend.Variable B frontend.Variable C frontend.Variable } func (circuit *circuit) Define(curveID ecc.ID, cs *frontend.ConstraintSystem) error { // define multiplication constraints cs.Mul(circuit.A, circuit.B, circuit.C) return nil } - Generate the proving and verification keys for the circuit:
// create a new circuit instance myCircuit := new(circuit) // initialize the circuit variables var values [3]frontend.Variable values[0] = frontend.Variable{ID: 1, FieldElement: fe.One()} values[1] = frontend.Variable{ID: 2, FieldElement: fe.One()} values[2] = frontend.Variable{ID: 3} // compile the circuit to generate the proving and verification keys pk, vk, err := groth16.Compile(groth16.SNARK, myCircuit, curveID, values) if err != nil { log.Fatal(err) } - Connect to immudb and store the keys and circuit:
// connect to immudb options := client.DefaultOptions().WithAddress("127.0.0.1").WithPort(3322) client, err := client.NewImmuClient(options) if err != nil { log.Fatal(err) } // store the keys and circuit in immudb _, err = client.Set(schema.EncodeToString(pk), schema.EncodeToString(vk)) if err != nil { log.Fatal(err) } _, err = client.Set(schema.EncodeToString(pk)+"_circuit", schema.EncodeToString(myCircuit)) if err != nil { log.Fatal(err) } - Retrieve the keys and circuit from immudb:
// retrieve the keys and circuit from immudb pkBytes, err := client.Get(schema.EncodeToString(pk)) if err != nil { log.Fatal(err) } vkBytes, err := client.Get(schema.EncodeToString(vk)) if err != nil { log.Fatal(err) } circuitBytes, err := client.Get(schema.EncodeToString(pk) + "_circuit") if err != nil { log.Fatal(err) } // decode the bytes into their respective objects decodedPK := &groth16.ProvingKey{} decodedVK := &groth16.VerifyingKey{} decodedCircuit := new(circuit) if err := decodedPK.UnmarshalBinary(pkBytes.Value); err != nil { log.Fatal(err) } if err := decodedVK.UnmarshalBinary(vkBytes.Value); err != nil { log.Fatal(err) } if err := decodedCircuit.UnmarshalBinary(circuitBytes.Value); err != nil { log.Fatal(err) }
That’s it! Now you can use the keys and circuit to generate and verify proofs with the circuit stored in immudb in an immutable format.